
Dat Server Node Tutorial
Install Dat CLI + Homebase Dat Pinning Server
For this tutorial we will focus on setting up a Dat server using Node JS, and the corresponding node modules, pm2, dat and @beaker/homebase.
To outline what we will be covering in this tutorial, we will cover the following:
- Installing Node and NPM via NVM
- Installing Dat CLI
- Installing and setting up Homebase
- Installing PM2 and running Homebase as a daemon
A quick note to make is that Dat CLI is not needed for this process, however, I have added it in because currently Dat Protocol does not have multi-writer capabilities. Thus, having your Dat CLI installed on your server helps to create a neutral computer where multiple collaborators can have access to, and work on the same document without having to fork them.
Installing Node and NPM via NVM
Now you might already have Node and NPM on your system and if so you will probably be able to skip this section. However, before you do make sure that you are able to run node without any permission issues. While in a test environment its alright to run node and its global modules under sudo - for live production servers it’s advisable to make sure node can run without root privileges. This can test this by running the NPM global install process like so npm install -g nodemodule. If you get permission errors and you don’t want to deinstall Node and NPM you can try following this guide by NPM which will walk you through the process of correcting any permission issues you might have. Personally, I prefer starting fresh. However, this up for you to choose.
Now Node can be a pain - and from version to version there can be stability problems (not to mention the permission issue previously spoken about). And while NPM (which is Node’s package manager) is great for maintaining up to date modules, NPM isn’t the best for maintaining an up-to-date Node JS. You can update node via NPM if you like - and if so follow this link for more info.
NVM (Node Version Manager) is a nice programme because not only does it allow for easy updating to the latest version of Node, it also installs the latest version of NPM to that corresponding Node version. In addition to this, NVM creates a ~/.nvm directory in your home folder where you can find your latest version of node and the installed global modules, which alleviates the permission issues that Node normally has. Another nice thing is that NVM allows for you to transfer all of your preexisting global packages to the current version of Node you are using.
To install nvm run this command in your terminal:
curl -o- https://raw.githubusercontent.com/creationix/nvm/v0.33.11/install.sh | bash
Once the install is done we will have to verify the install. Do this by opening a new terminal window and run the command command -v nvm.
Now that we have verified our nvm install we can use nvm to install node (and npm). Run:
nvm install node  ## "node" is an alias for the latest version

## To install a specific version of node:

nvm install 6.14.4  ## or 10.10.0, 8.9.1, etc.
This should be the only command you have to run to get node and npm. You can verify the installs as per the usual method: node -v and npm -v. The final thing we want to check is that there are no permission issues. Global install a node package by running npm without the sudo prompt like so: npm install -g nodemodule. If you would like to learn more about nvm and its commands you can read more here.
And there you have it! Node and NPM without permission issues!
Installing Dat CLI
Dat CLI is the core programme (other than Beaker Browser) for creating Dat archives and sharing them with peers. As noted in the beginning of this tutorial, Dat CLI isn’t needed for a Homebase server, but seeing as Dat currently does not have multi-writer capabilities - having a neutral computer that can setup archives, which multiple writers have access to is nice. Plus with Homebase installed you can pin your archives immediately so they have a permanent presences and share them with others!
To get started, we can install Dat CLI via npm, by running:
npm install -g dat
And that is basically it! For more info on Dat CLI’s commands and capabilities please see Dat Project’s github page for more documentation, its great and super easy to follow!
Installing and setting up Homebase
Now we are finally at the main event, setting up your personal (or collective’s) Dat pinning service! To briefly discuss Homebase… this module is based off the the Beaker Browser team’s Hashbase service, though a slimmed down version. It does come equipped with the proposed PSA pinning API. It also has Let’s Encrypt built into it, meaning we should be able to provide SSL certificates for our Dat urls, giving them https - which is extremely important - because currently Beaker Browser uses the /.well-known/dat method to identify whether a https sites also has a dat archive version. You can read more about this here.
Homebase is also able to serve your Dat via http and https without nginx, though by default Node does not have access to root ports - which are normally ports 1 to 1024. If you would like to learn how to configure Node to have access to the standard http (80) and https (443) you can visit this more advance tutorial. For this workshop this will be a follow-on step that you can experiment with on your own time.
As to serving Dats, Homebase uses port 3282 by default. There is one thing to note here, having Homebase and Dat CLI alongside each other causes port conflicts, which are normally auto rectified by Dat CLI as its programmed to start using other random ports to sync with its peer swarm. The problem with this is that it causes firewall issues (CROM!!!). My current work around for this (which isn’t the best practice) is to disable my iptables settings (And in your case whatever firewall modules and settings you might be using) to allow a free flow of traffic to Dat CLI. There are ways to setup iptables to allow a user to have access to any port it wants to use. However, that setup is beyond the scope of this tutorial. So for this session we will ask you to disable your Raspberry Pi’s firewall, if you have one setup.
Now to move on to the install process… Let’s run the command:
npm install -g @beaker/homebase
Homebase has two primary parts that we have to focus on after the install, which are the ~/.homebase.yml config file and the ~/.homebase/ directory. By default Homebase expects to find these two things in the home folder of the current user. So lets first create the directory (if it does not exist yet) mkdir .homebase. Next lets create the config file using your favourite text editor (I’m using nano): nano .homebase.yml.
For this tutorial we will be setting up a normal pinning service without DNS support. Below I have provided the essential configuration for a pinning service without DNS:
dats:
  - url: dat://01cd482f39eb729cdcbb479b03b0c76c6def9cfc9cff276a564a17c99c4432f4/
  - url: dat://b0bc462c23e3ca1fee7731d0a1a2dc38bd9b9385daa413520e25aea0a26237a6/
  - url: dat://f707397e8dacc1893dced5afa285bab1715b70fe40135c2e14aac7de52f2c6bb/

directory: ~/.homebase        # where your data will be stored

# For API service. Establish API endpoint through port 80 (http)
ports:
  http: 8080                  # HTTP port for redirects or non-TLS serving
In my experience Homebase does not require a specific order for its configs - so if you’ve seen on the github Homebase page a different order of configuration - don’t fret! The way I wrote out Agorama’s config file suits my person best and allows for me to read through in an understandable order. So when setting up your config file please re-order the configs for your comfort. Also if you would like to know more about the other configurations please see the Homebase github repo.
To go through the provided configs… The first part pertains to the dat archives you would like to pin to your service. Homebase upon activation with seek out these dat archives and clone then into the created .homebase/ directory, which takes us to the next part of our configuration.
directory: ~/.homebase
This setting as you’ve probably guessed corresponds to the directory where Homebase will keep all of your pinned archives. You can navigate to this folder if you like, and inside you will find a list of directories named after the dat hash. Each will contain the cloned file to the pertaining dat archive. The final part of the config is the port settings for Homebase. In this current iteration of the configs you don’t need access to ports 80 or 443, so we can use a local port like 8080, which will not cause any EACCES errors while running Homebase. Note we need this setting to be pointing to a port at all times or Homebase will be unhappy with you.
And that’s all you need to get started with Homebase! You can start Homebase up to test it by running homebase in your terminal, which should present you with a prompt like so:
== Homebase 2.0.3 ==

 ▶ Directory:    /Path/To/.homebase
 ▶ Ports:        8080 (HTTP) 443 (HTTPS)
 ▶ HTTP mirror:  ✖ disabled
 ▶ Lets Encrypt: ✖ disabled
 ▶ Dashboard:    ✖ disabled
 ▶ WebAPI:       ✖ disabled

Serving
  dat://67c8eaca9437650e16e60e5a874e7e8b438b5924c4ba7f109412f020edb89031/
  at
Serving
  dat://7aeb3df618daeb74c92ec11f3102e71c313e681e2febf957bef0095766318874/
  at
So to briefly sum up whats been done so far, after installing Homebase we created the corresponding config file .homebase.yml and serving directory ‘.homebase’ is our servers home folder. From there we configured our .homebase.yml file by pinning a couple dats, and setting the location to the location of the .homebase directory. Then we run Homebase using homebase in our terminal. To shut Homebase off hit ctrl + C.
At this point we do not need to give node any permissions to use port 80 or 443, because we are not enabling http mirroring, which requires Homebase to access those ports if Nginx is not present and providing a proxy for Homebase.
As you can see this is a very simple setup - however one annoying thing is that currently if we want to pin new dats to our Homebase instance we have to ssh into our server and copy and paste this new archive’s hash into the .homebase.yml config file. While this is not so bad, Homebase does have a pinning API built into it. Lets review a config file that might uses this API:
dats:
  - url: dat://01cd482f39eb729cdcbb479b03b0c76c6def9cfc9cff276a564a17c99c4432f4/
  - url: dat://b0bc462c23e3ca1fee7731d0a1a2dc38bd9b9385daa413520e25aea0a26237a6/
  - url: dat://f707397e8dacc1893dced5afa285bab1715b70fe40135c2e14aac7de52f2c6bb/

directory: ~/.homebase # where your data will be stored

# For API service. Establish API endpoint through port 80 (http)
ports:
  http: 80                  # HTTP port for redirects or non-TLS serving

# enable publishing to homebase from Beaker and the Dat CLI
webapi:                     # set to false to disable
  username: User            # the username for publishing from Beaker or the Dat CLI
  password: Secret          # the password for publishing from Beaker or the Dat CLI
As can be seen above we have now added the configurations for the webapi. Its really simple and has three settings: username, password, and domain name being used (which is optional). Now there are two ways we can go about this, the first is to set up the API to be reachable on an IP with no DNS (thus we will not need the domain: setting), the other is to direct a domain name to our API service, which in this case means we will need the domain: setting.
Anyway, if everything is ok when we run Homebase we should get a prompt showing us that the Web API is now active:
== Homebase 2.0.3 ==

 ▶ Directory:    /Path/To/.homebase
 ▶ Ports:        8080 (HTTP) 443 (HTTPS)
 ▶ HTTP mirror:  ✖ disabled
 ▶ Lets Encrypt: ✖ disabled
 ▶ Dashboard:    ✖ disabled
 ▶ WebAPI:       ✔ enabled undefined

Serving
  dat://67c8eaca9437650e16e60e5a874e7e8b438b5924c4ba7f109412f020edb89031/
  at
Serving
  dat://7aeb3df618daeb74c92ec11f3102e71c313e681e2febf957bef0095766318874/
  at
The final test we should run to confirm that we can access the web API is by heading to our servers local address. If you are doing this directly from your pinning server, enter http://127.0.0.1:8080, alternatively if you are using a separate computer to access your pinning service enter into your browser url bar http://192.168.0.10:8080. Of course in your case the IP address and port number will be different. To find your server’s local address you can run the ifconfig command in your server’s terminal. If everything is successful, when we navigate to our server’s IP and port we should see a blank screen with only Cannot GET / appearing. The reason for this is because there is nothing programme to appear on the root of the API service. However, The message Cannot GET / doesn’t mean that Homebase is serving content, its just that nothing is at the web root. But how do we know if things are working? Well this can be done by navigating to http://127.0.0.1/.well-known/psa which should present you with:
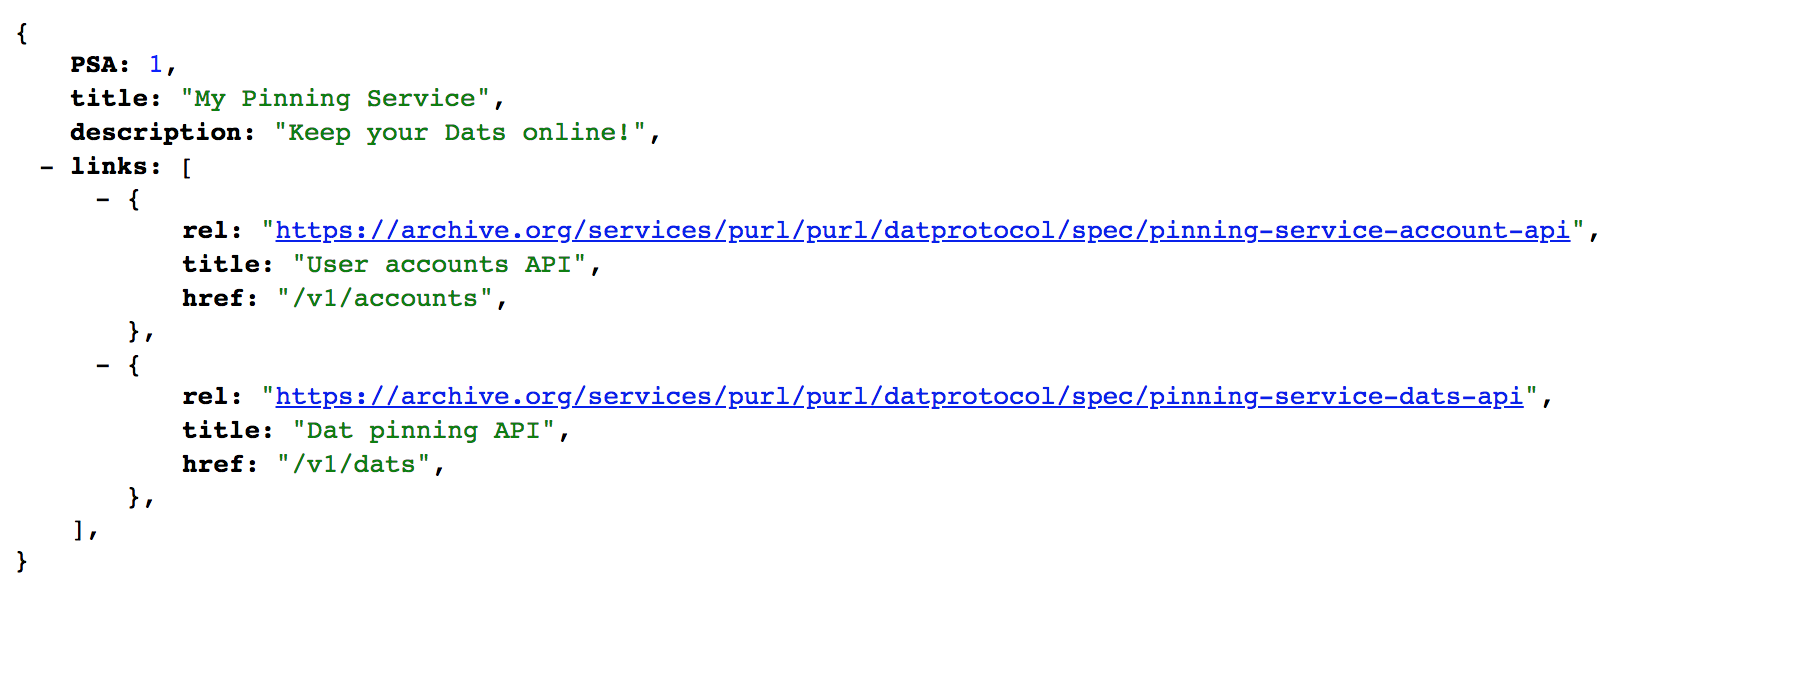
And thats all she wrote! You have a functioning Homebase Dat server with pinning API end point!
Installing PM2 and running Homebase as a daemon
Now its time to daemonise your service. This can be done through the Node module pm2. Let’s run the install via npm: npm install -g pm2. Once installed lets start Homebase with PM2 - pm2 start homebase, which should prompt PM2 to initialises and also start Homebase. This should be followed with a similar output as presented below:

If you are like me and want to keep tabs on the activities of Homebase, or any other processes being run by pm2, you can find all the logs in the directory ~/.pm2/logs/. For more information on PM2 please see their site for documentation.
And there you have it! A fully functioning Dat Node Server.