
p2p Web Jam 2

In order to make contributing to the infastructure of the p2p web as easy as possible we are collating resources to create simplified guides to installing Homebase (a dat server) on a Raspberry pi.
On Saturday 27th April 2019 we gathered at the studio to walk through the installation process of turning a Raspberry pi Model 3 into a homebase server. We have already done this on a few pis in our studio (see this post but we were looking to streamline the process so we could deploy this custom p2p web server stack to multiple pis. As always our attitude was to learn through doing and through an open workshop that anyone could drop in and learn about configuring their raspberry pis into p2p web servers.
One of our server co-op members Piper has published this very good read me which we have copied pasted from to ensure this could help others repeat the process. The guide assumes you already have a raspberry pi with raspbian installed but IF not, do not worry, visit Piper’s notes here or start here from 0.

AIM(S) - to configure a streamlined install process for batch deployment of homebase servers on the raspberry pi 3 model B.
Requirements
- Raspberry pi 3 Model B
- SD card with raspbian installed
- HDMI Monitor
- Keyboard + Mouse
- Wifi + electricity

How many heads are required before you can login headless to your raspberry pi?
Step 0 Install Raspbian on SD Card-
If you have yet to turn on your raspberry pi for the first time you must first do some preliminary steps.
- A) Flash Raspbian onto an SD card using a program called etcher or using your command line ‘DD’
dd bs=4M if=2018-11-13-raspbian-stretch.img of=/dev/SDX conv=fsync status=progress
please ensure you have selected the correct directory as flashing will remove all data from disk Reference
-
B) Connect Raspberry Pi to WiFi on the command line
-
With your SD card that now has Raspbian installed, plug into a computer (using a micro SD card reader) and you want to edit ‘wpa_supplicant.conf’ file to add the details for the wifi network you want the raspberry pi to connect to
-
with a text editor open up
/Volumes/boot/wpa_supplicant.confif this does not yet exist create a file using the Command Linenano /Volumes/boot/wpa_supplicant.conf -
Add your wifi information in here and copy this into your wpa_supplicant.conf file
country=gb
update_config=1
ctrl_interface=/var/run/wpa_supplicant

network={
  scan_ssid=1
  ssid="YOUR_NETWORK_NAME"
  psk="YOUR_NETWORK_PASSWORD"
}
-
once this is done, make sure to save the file and eject the mounted disk properly to avoid any damage.
-
C) Enable SSH on the Raspberry pi
- plug your SD card with raspbian mounted onto your computer
- open the command line and enter
touch /Volumes/boot/ssh -
This will create a new empty file titled ssh in the root of your SD card. This empty file will allow you to connect via SSH when the Pi is first booted.
- D) Log in to a Raspberry Pi via SSH as the root user pi
ssh pi@raspberrypi.local - if your having trouble connecting to your Raspberry pi, try pinging it to see if it has successfully connected to the network
ping raspberrypi.localYou can also view all the devices on a network with a handy mobile application called fing. This app will show all the devices on the pi and their ip address. If your pi has successfully connected to the wifi network it will be listed in this app. you can then ssh into with the command
ssh pi@192.172.3.4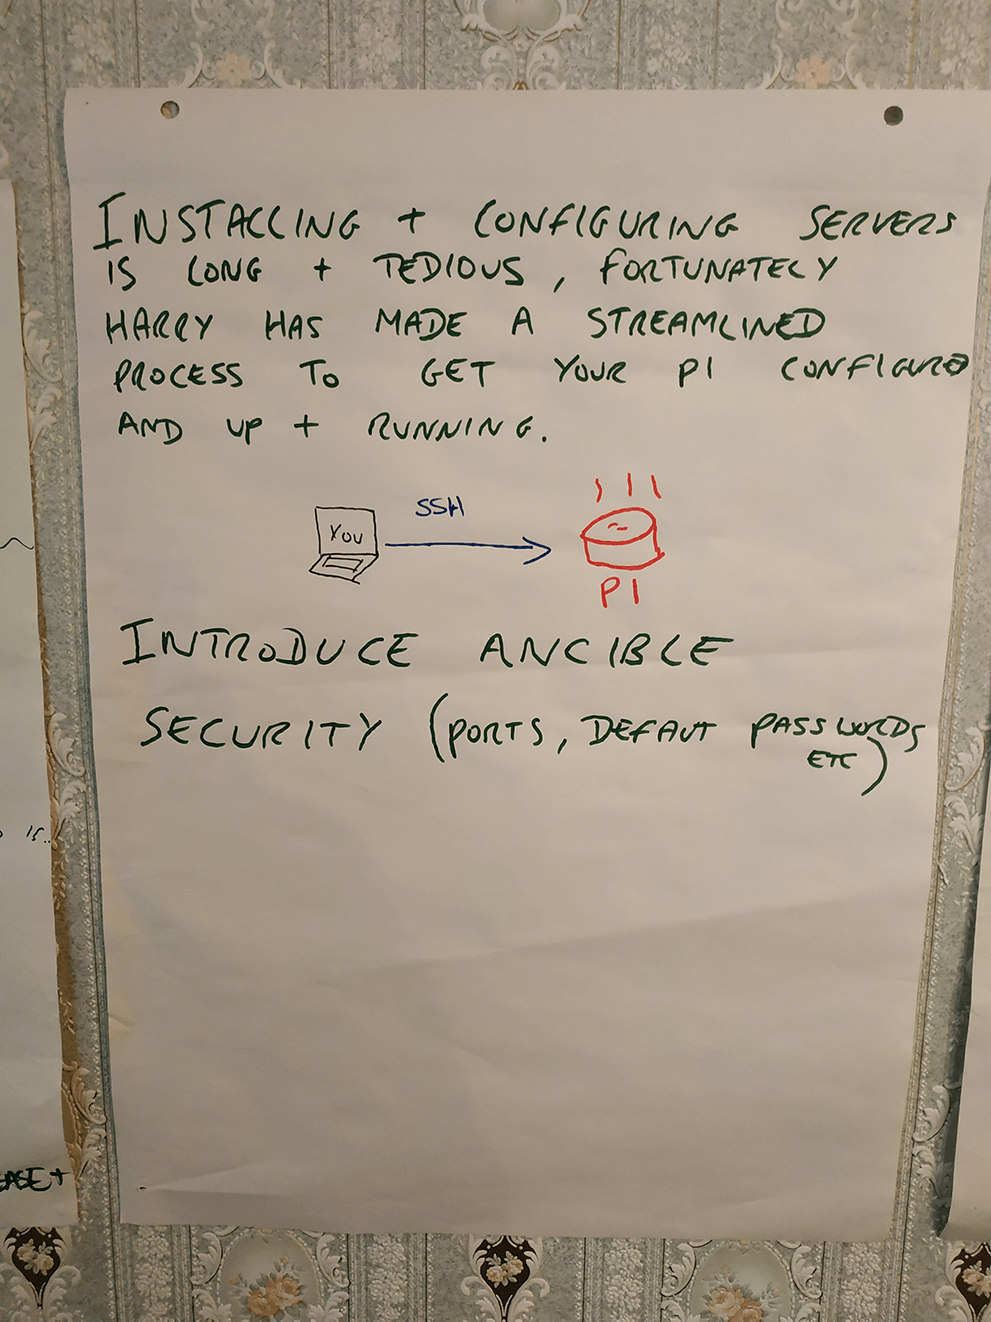
Step 1 Use Ansible to Configure your Raspberry Pi Server
- Agorama’s Ansible Raspberry server playbook automates a number of fiddly tasks that are required to get a Raspberry Pi set up as a server geared towards use with Homebase. You can get a feel for the tasks that will be performed by the playbook by browsing the files within the playbook, working backwards from all.yml.
This is a fork of Harry Lachenmayer’s Raspbery pi Ansible server that automates alot of the heavy lifting when configuring rpis. e.g. installing nginx, node, DNS and lots more. Each component is optional and can be run by selecting various playbooks that are stored as .YML files.
Once you follow the steps on this github you should have a raspberry pi with node and nginx installed. Now its time for fun part ;-)
Step 2 Install DAT and run Homebase on a Raspberry Pi server
For security purposes, the Ansible playbook configures worker user on Raspberry server so that we’re not using the root user pi to install and run software. When you first log in with SSH you are logged in as the root user, so we need to switch to worker by running:
- A) Change user to the worker user that was set-up to run the ansible playbooks
sudo su worker - B) Install Dat
npm install -g dat - C) Test whether or not the dat installation works with the Pi configuration by running:
dat doctor - D) Install homebase by running:
npm install -g @beaker/homebase - E) Change directory to the user root:
cd - F) open up the Homebase config with nano, then paste in:
  - url: dat://01cd482f39eb729cdcbb479b03b0c76c6def9cfc9cff276a564a17c99c4432f4/
  - url: dat://b0bc462c23e3ca1fee7731d0a1a2dc38bd9b9385daa413520e25aea0a26237a6/
  - url: dat://f707397e8dacc1893dced5afa285bab1715b70fe40135c2e14aac7de52f2c6bb/

directory: ~/.homebase        # where your data will be stored

# For API service. Establish API endpoint through port 80 (http)
ports:
  http: 8080                  # HTTP port for redirects or non-TLS serving
Swapping the DAT Urls to DATS of your choice. this config YML file is extremely fussy about indentation so make sure everything is tidy before saving it!
- G) Now you can run Homebase from your CLI
homebase - H) H is for Homebase which should now display it is running with the following
 ▶ Directory:    /home/pi/.homebase
 ▶ Ports:        8080 (HTTP) 443 (HTTPS)
 ▶ HTTP mirror:  ✔ enabled
 ▶ Lets Encrypt: ✖ disabled
 ▶ Dashboard:    ✖ disabled
 ▶ WebAPI:       ✔ enabled undefined

Serving
  dat://7aeb3df618daeb74c92ec11f3102e71c313e681e2febf957bef0095766318874/
  at
Serving
  dat://f707397e8dacc1893dced5afa285bab1715b70fe40135c2e14aac7de52f2c6bb/
  at
Serving
  dat://abb7e977f41cd11e0b58178256b9919004e7d6a96126c5822f42cddc67e43487
  at
Serving
  dat://1f1c214b103def29a0df591d1e335710cfa29a308d14ebc0b1e2e11778828663/

STEP 3 - Turn Homebase into a daemon service
Daemonizing homebase means that it will constantly run in the background as long as the service hasn’t failed, the server is on, and the server is connected to the internet.This is important because the whole point is that we want the Dat sites that are listen in .homebase.yml to run in perpetuity. There are multiple ways to do this (Cron, rc.local, pm2) but we have found the most reliable is with Systemd
A) add a service configuration for homebase. As the root user pi, run:
sudo nano /etc/systemd/system/homebase.service
B) in this file copy and paste the following:
[Unit]
Description=homebase

[Service]
Type=simple
ExecStart=/usr/bin/env .npm-packages/bin/homebase
WorkingDirectory=/home/worker/
Restart=on-failure
StandardInput=null
StandardOutput=syslog
StandardError=syslog
Restart=always
SyslogIdentifier=homebase
User=worker
Group=worker

[Install]
WantedBy=multi-user.target
save and exit the file.
E) to start and stop the service type:
sudo service homebase start
sudo service homebase stop
F) If you make changes to the homebase.service file, you must reload the system.d service for the changes to take effect
systemctl daemon-reload
Congratulations, you should now have homebase running as a service on your raspberry pi. This will help keep your DATS seeded more permanently. In the next guide we will introduce how to configure a Dynamic DNS so you can serve your DATS over HTTP and the p2p web.
Thanks to Harry Lachenmayer and Piper Haywood for helping and everyone who attended the workshop